10 Powerful Steps to Customise Your COS Cavatelli Bag: The Ultimate DIY Guide!
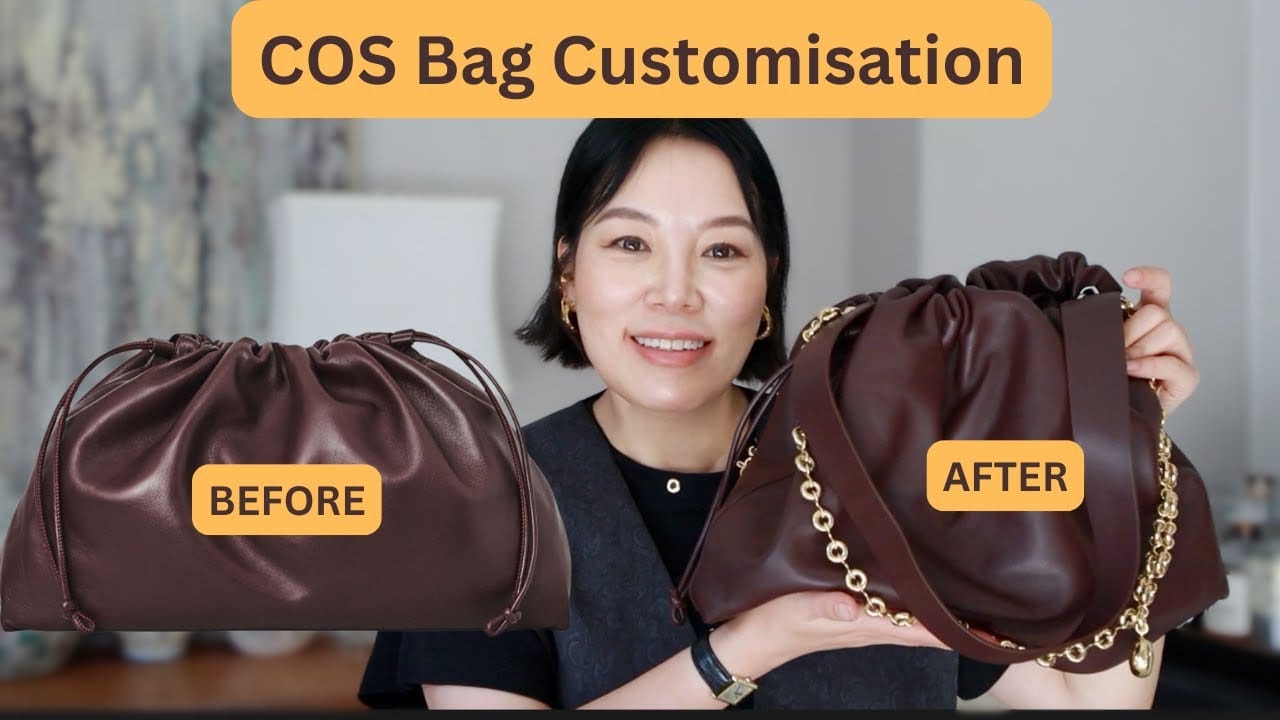
Hi Lovelies! Hope you are doing well! In today’s video, I’m sharing with you that I have customised a bag that I have recently …
source
COS Cavatelli Bag Customisation: A DIY Guide to Personalise Your Style
In the world of fashion, customization is the ultimate expression of individuality. Whether it’s adding personal touches to a beloved item or creating something entirely unique, DIY projects allow you to showcase your creativity. One popular item that lends itself beautifully to customization is the Cavatelli Bag from COS. This chic bag is not just a fashionable accessory but also a blank canvas for your imagination. In this article, we’ll explore various ways to personalise your Cavatelli Bag, turning it into a one-of-a-kind masterpiece.
What is the Cavatelli Bag?
Before we dive into customisation techniques, let’s talk about the Cavatelli Bag itself. Inspired by the soft, pillowy shape of the traditional Italian pasta, the Cavatelli Bag is known for its easy-going elegance and functional design. Made from high-quality materials, it features a spacious interior for everyday essentials, making it both stylish and practical.
Why Customise?
- Self-Expression: Personalizing your bag makes it uniquely yours and a reflection of your style.
- Gift Personalisation: A customized bag makes for a thoughtful and unique gift.
- Sustainable Fashion: Rather than buying new bags, customising what you already own promotes sustainability.
Materials Needed for Customisation
Before starting your DIY project, gather the following materials:
- Cavatelli Bag: Choose your base bag in a neutral color.
- Fabric Paints or Markers: For adding designs.
- Embroidery Thread and Needle: For stitching motifs or initials.
- Iron-On Patches: Choose designs that resonate with you.
- Stickers or Vinyl Decals: Waterproof options are great for durability.
- Beads or Charms: To add some sparkle and dimension.
- Scissors and Craft Glue: For various attachments.
- Fabric Sealer: To protect your designs.
Step-by-Step Customisation Guide
1. Plan Your Design
Start by sketching out ideas on paper. Consider themes that resonate with your personality, such as:
- Nature-inspired patterns (leaves, flowers)
- Abstract designs
- Textures or geometric shapes
- Inspirational quotes
- Your initials or name
2. Choose Your Technique
Decide how you’d like to customise your bag. Here are some popular methods:
A. Fabric Painting
- Prep the Bag: Clean the area where you’ll be painting.
- Sketch Lightly: Use a pencil to lightly outline your design.
- Paint: Apply fabric paints with a brush or sponges. Allow drying time.
- Seal: Once dry, apply a fabric sealer to protect the artwork.
B. Embroidery
- Choose Your Thread: Pick colors that complement your bag.
- Initials or Motif: Start by stitching a simple initial or a small design.
- Create Patterns: Explore different stitches or create lasting patterns for more intricate designs.
C. Patches and Stickers
- Placement: Arrange patches or stickers on the bag to see what looks best.
- Iron-On Patches: Follow the instructions provided. Use a hot iron to securely attach them.
- Stickers: Ensure surfaces are clean; apply pressure for adhesion.
D. Beading and Charms
- Plan Your Arrangement: Decide where to add beads or charms.
- Attach with Glue or Stitch: Use craft glue for a secure bond or stitch directly onto the fabric.
- Balance the Design: Ensure accompaniments are evenly spaced for a cohesive look.
3. Final Touches
Once your design is complete, step back and assess. Make sure everything is securely attached and show off your unique design! Optionally, you can add an interior lining or organize your essentials with small pouches to keep things tidy.
4. Care Instructions
To maintain the longevity of your customisation:
- Hand wash your bag gently.
- Avoid harsh detergents.
- Store it in a cool, dry place away from direct sunlight.
Conclusion
Customising your COS Cavatelli Bag is not just a fun DIY project—it’s an opportunity to create something that truly represents who you are. With a few simple materials and techniques, your chic bag can take on new life and character. Whether you opt for painting, embroidery, or embellishments, the possibilities are endless. So gather your supplies, unleash your creativity, and enjoy the process of making your Cavatelli Bag uniquely yours!


Post Comment