5 DIY Power Ideas: Create Stunning Stamping Jill Teacher Gifts in Just 30 Minutes!
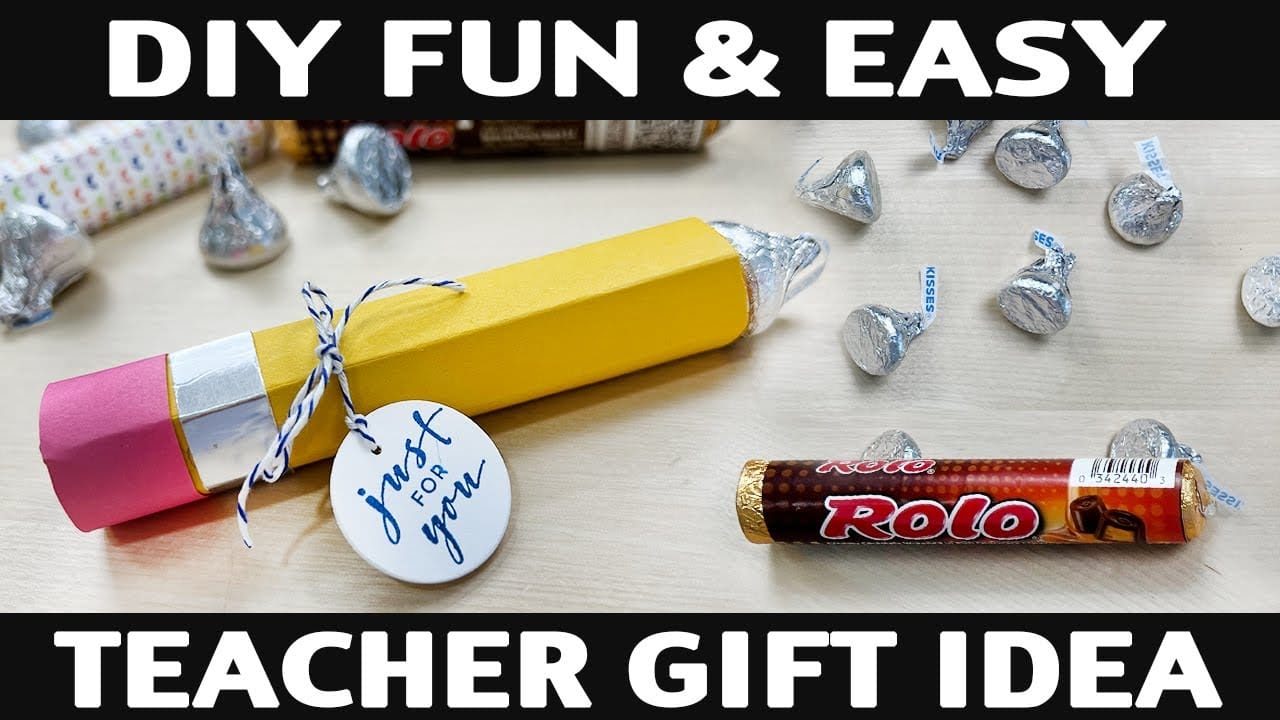
Stampin’ Up! Demonstrator Jill Olsen demonstrates a fun an easy teacher gift idea using some cardstock and a Rolo candy bar …
source
Stamping Jill: DIY Fun & Easy Teacher Gift Idea
As the school year comes to a close, it’s the perfect time to show appreciation for the hard work and dedication of our teachers. While store-bought gifts can be lovely, a DIY present adds a personal touch that can make any educator feel truly valued. This year, why not consider a creative project that combines practicality with charm? Enter: Stamping Jill—a DIY stamping kit that makes for an easy yet thoughtful teacher gift idea.
Why Stamping Jill?
Stamping Jill is not just a gift; it’s an invitation to creativity. Teachers often have to grade papers, prepare lesson plans, and return assignments. A stamping kit can add fun flair to their work while making it easier for them to express their motivational messages, comments, or even reminders. Plus, it’s a gift that keeps on giving—allowing them to enjoy it long after the school year ends.
What You’ll Need
Creating your Stamping Jill kit is simple and doesn’t require fancy materials. Here’s what you’ll need to gather:
Rubber Stamps: Look for a variety of rubber stamps featuring positive messages, fun designs, or curriculum-related symbols (like apples or books).
Ink Pads: Choose a selection of colorful ink pads. Bright colors can make feedback more engaging for students and can add an element of fun to grading.
Blank Index Cards or Sticky Notes: These are perfect for educators to use as notes for students, making it easy for them to write little messages and reminders.
A Caddy or Box: Find a small basket or decorative box to hold all these fun items together. This will make the kit easy to store and carry.
- Personal Touches: Consider adding a handwritten card expressing your gratitude. You can also personalize the box with the teacher’s name or an inspirational quote about education.
Steps to Create Your Stamping Jill Kit
Gather Materials: Collect all the items listed above. You might want to visit a craft store for unique stamp designs or get creative and even make your own stamps out of potatoes or foam!
Prepare the Box: Decorate the caddy with vibrant colors or stickers that represent the subject your teacher specializes in. This adds a personalized touch that makes it extra special.
Arrange the Items: Neatly place the rubber stamps, ink pads, and index cards or sticky notes inside the caddy. Arranging the items aesthetically will make the kit inviting and exciting.
Write a Personal Note: Take a moment to write a thank-you card that highlights what you appreciate about the teacher. This makes the gift even more heartfelt.
- Present the Gift: Wrap the kit in cellophane or simply place it in the teacher’s mailbox at school, ensuring they know it’s from you. The anticipation of opening a surprise can make it even more exciting!
Additional Bonus Ideas
For those looking to elevate their Stamping Jill kit even further, here are a few suggestions:
Include a DIY Recipe Book: Share some of your favorite recipes or teaching strategies along with the stamps. This is especially great if the teacher is known for baking or cooking.
Add Customized Stickers: You can even create stickers with motivational phrases like “Great Job!”, “Keep it Up!”, or “You’re a Star!” that can be used alongside the stamps.
- Incorporate a Themed Mug: A fun mug to enjoy their favorite beverage while grading papers can complement the stamping kit beautifully.
The Bottom Line
As the school year wraps up, gifting a Stamping Jill kit is an affordable and meaningful way to show your gratitude to teachers who go above and beyond. Not only is it a creative project that you can put together in no time, but it also allows teachers to bring a little extra joy and personalization to their daily tasks. Celebrate their hard work with this thoughtful DIY gift that embodies creativity, appreciation, and fun!


Post Comment